HackTheBox: Delivery Walkthrough
Hi folks, it’s been a long time since I posted an article. So here I am back with another walkthrough but this time, it’s a box from HTB, “HackTheBox”. So without wasting further time, let’s get started. You can find this box on this link https://app.hackthebox.eu/machines/Delivery.

Before getting started, let’s first connect to HackTheBox vpn and run the machine,
Let’s get started with nmap scan,
sudo nmap -A -T4 -p- 10.10.10.222

nmap came back with it’s result and port 22, 80, 8065 ( unknown ) are open.
Let’s visit http://10.10.10.222/,

It shows us this webpage. There are some links on website that we’ll visit. First, let’s click on HELPDESK to see what happens,


seems like we can’t visit the website. But we can resolve this IP in /etc/hosts file with it’s domain name, in terminal, type
sudo nano /etc/hosts

add this IP address corresponding to it’s domain and save this file. Now, when we visit this website it shows us this page,

this webpage opens up when we visit this domain.
Let’s create a ticket in order to proceed further,

When we click on create, this application will generate us a ticket.

Look at this! We have a @delivery.htb email address we can use. Let’s leverage this feature to gain access to Mattermost service.
Let’s create an account on mattermost service,

after filling all information, when Create Account button is clicked, it’ll first want to verify us.

with this message that we got, we’ll go and verify where we created this ticket, i.e. http://helpdesk.delivery.htb.

Let’s fill the email address by which we generated this ticket and the ticket number which is generated by application.
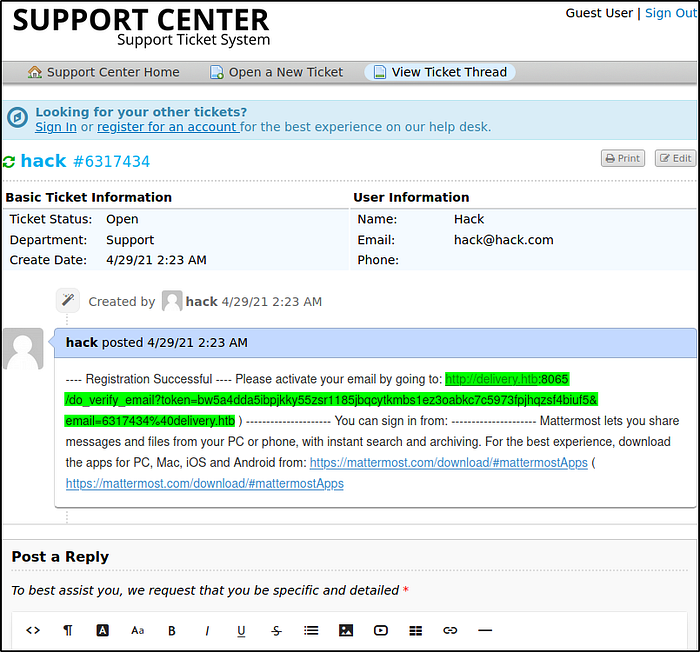
We’ll get this ticket and there’s a verification url. We’ll grab this url and paste this in new tab,
we’ll get verified now and we can login into our account,

now when we sign in, we’ll see this page,

there’s a internal button. By clicking in there, we’ll get to see the chats of root user.

and we got the login credentials of server, i guess SSH? let’s try.
ssh maildeliverer@10.10.10.222

we got access to maildeliverer user. Let’s search for user flag,

we got our user flag. That was not tough.
Privilege Escalation: We’ll now do privilege escalation. After system enumeration, I found nothing specific, maildeliverer user doesn’t have any sudo permissions. But after website enum, there’s a text left behind by root user,

And we know since it’s a website that generates help-ticket, so it maybe that the system also running MYSQL as DB. There’s a /opt/mattermost/config/config.json file which has text-plain username and password for mysql login.
cat /opt/mattermost/config/config.json

these are the login credentials for mysql service. Now, let’s login in the machine itself,
mysql -u mmuser -D mattermost -p

we got in. Now, we’ll look for users tables, generally all the credentials are stored there.
SELECT username, password FROM Users WHERE username = ‘root’;

look what we got. Let’s take this hash and try to get the type of this hash by using hashid tool, firing our tool

we can see that this hash is bcrypt, and we’ll be using https://github.com/praetorian-inc/Hob0Rules.git, to crack this hash. But before proceeding, create a new file named rockyou.txt and paste the PleaseSubscribe! (which we found earlier) string into that file.
Looking in hashcat table, mode of this hash is 3200, so let’s crack this hash,
hashcat -m 3200 -a 0 hash wordlist.txt -r ~/Hob0Rules/hob064.rule -o cracked.txt -w 3 -O

and we got the cracked password. Now’s the time to get root. Switching user to root user,
su — root

we got root access!! Now, let’s hunt root flag,
In /root dir, establish every file and directory using ls command,

we got root flag and there’s a note left by creator of this box [ i guess :) ], take your time to read it. We’ve successfully pwned this box.
Thanks for reading, :)
